Pages

Showing posts with label main dish. Show all posts

Sunday, April 30, 2017

Baked Chicken Fajitas

I get excited when I try a new recipe and it exceeds my expectations. Sheet Pan Chicken Fajitas came together easily and the finished product was delicious. Fajitas are usually cooked in a very hot frying pan. It is a meal that requires last minute craziness. The prep for Fajitas is is the same however you cook them. I just like the idea of letting the oven do the cooking, it is basically unattended. That is good. While the Fajitas are cooking I am free to prep the yummy toppings that must accompany Fajitas.

Sheet Pan Chicken Fajitas
1 pound boneless, skinless chicken--I use Costco Chicken Tenders
2 peppers, red, yellow or orange
1 poblano pepper--these are very mild and add a great flavor, green pepper can be substituted
2 jalapenos--do not use seeds or membranes for a milder flavor. I do wish there was a way to know just how hot a jalapeno is! I always use food prep gloves when handling jalapenos. I have learned the hard way. Jalapenos add a wonderful flavor. We love them!
1 large onion
2 tablespoons taco seasoning, I make my own because I have to do something with all the Penzys spices I own! I'm sure you could use a package mix. Penzys also has a yummy Fajitas blend. So many choices. I think the point is to season well!
2 tablespoons olive oil
8-10 tortillas
garnishes such as cilantro, lime wedges, guacamole, sour cream, salsa

Preheat oven to 425 degrees. Brush a large sheet pan with oil.
Cut the chicken against the grain into 1/4 to 1/2 inch wide strips
Cut bell and poblano peppers into long thin slices--1/4 inch wide
Slice the jalapenos into thin rounds (remove seeds and membranes first)
Cut ends off of onions. Cut in half from pole to pole. Cut into thin slices
Scatter peppers, onions and chicken on sheet pan. Sprinkle with taco seasoning and drizzle with olive oil. Use tongs to toss until everything is coated--spread in an even layer. Bake uncovered for 30 minutes, stirring half way through. Serve on warm tortillas with lots of garnishes.
Printable recipe
This recipe came from The Yummy Life.


Sunday, September 25, 2016

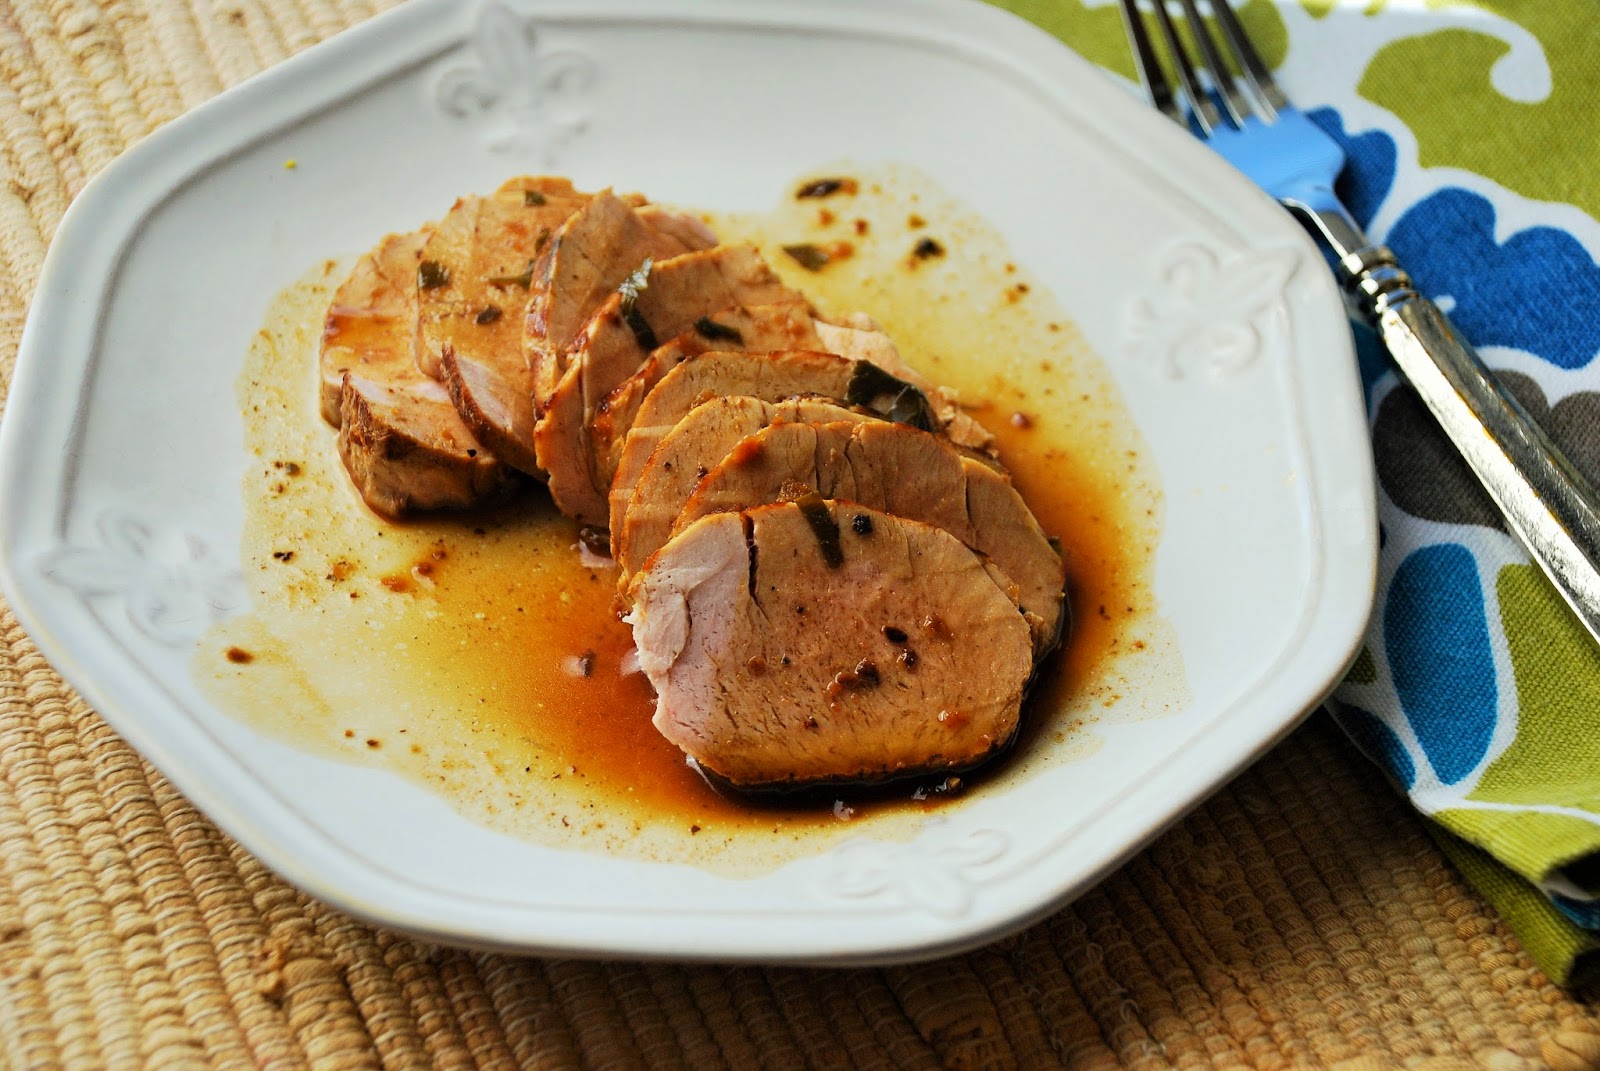
Sweet and Spicy Pork Tenderloin


I do love pork tenderloin. Once I purchased a good meat thermometer my pork was delicious. Overcooked pork is dry and chewy--not good. Pork cooked to 140-145 is moist and delicious, you can cut it with a fork. Pork tenderloin is really a fast food, you can easily make it on a week night. This recipe can be made in under 40 minutes. Most of that time is cooking/resting.
My daughters are great cooks, we share recipes and encourage each other to cook dinner. Jill was kind enough to share this recipe. I am glad she did as I probably wouldn't have made it without her positive review. Really who uses cinnamon when cooking pork?  Please trust us, it is so good. It is an amazing combination of sweet and spicy. Add it to your dinner rotation.

Sweet and Spicy Pork Tenderloin
1 pork tenderloin (about 16 ounces)
1 tablespoon olive oil
Dry Rub
1 1/2 teaspoons salt
1/4 teaspoon pepper
3/4 teaspoon cinnamon
3/4 teaspoon cumin
3/4 teaspoon chili powder
Glaze
2/3 cup brown sugar
3 large cloves garlic--pressed
2-3 teaspoons Franks or Cholula hot sauce
Heat oven to 350. Trim silver skin from tenderloin and pat dry. I cut the tenderloin in half because it fits it my frying pan better. In a small dish mix together dry rub ingredients. Rub the spice mixture over the pork to coat.
Heat olive oil in a heavy, oven safe frying pan till very hot. Quickly brown meat on all sides. It will smell amazing! Leave meat in frying pan. Combine glaze ingredients and spread/pat on tenderloin. Bake 350 degrees for 17-20 minutes. Internal temperature should be 140 degrees. Remove from oven, leave meat in pan and tent with foil. Let rest for 10 minutes. Slice meat and drizzle with pan sauce.
Serves 4 adults.
Printable copy
I adapted this from a recipe found on Food.

Wednesday, July 13, 2016

BBQ Cilantro Chicken Pizza


I enjoyed a pizza at a local pizza joint that was amazing. It was a Hawaiian Pizza with a hint of barbecue sauce. It was unique and delicious. I am usually not a fan of barbecue pizza (just too much BBQ taste) but a hint was great.
This recipe was perfect. Basically an easy homemade pizza sauce with barbecue sauce mixed in. I topped the pizza with roasted chicken, pineapple, cheese and cilantro. I'm sure this would work great cooked on the grill.

BBQ Cilantro Chicken Pizza
Prepared pizza dough, I bought a pound of dough at the deli of my favorite market or make your favorite recipe
Sauce:
1 tablespoon minced garlic
1 small can tomato paste
1 medium can tomato sauce
1 tomato, finely diced
2 teaspoons basil
2 teaspoons oregano
salt and pepper
1 cup BBQ Sauce--your favorite brand
Toppings:
cilantro
Cheddar and mozzarella cheese
grilled/roasted chicken, rotisserie works great
pineapple fresh or canned (drained), cut in small pieces
cooked bacon (optional)
For the sauce, saute garlic in a little olive oil for 30 seconds, add tomato paste, tomato sauce, diced tomato, and seasonings. Simmer for 20 minutes. Remove from heat and stir in BBQ Sauce. Set aside.
Roll the pizza dough onto a stone or pan. I like my pizza crust thin. Pre-cook the dough in a 400 degree oven for about 6-8 minutes. Remove from the oven and spread with pizza sauce. Top with cheese and pineapple. Bake until cheese is melted and crust is done about 8-10 minutes. Remove from oven and top with chicken and cilantro and bacon.
I like this recipe because the BBQ flavor is subtle. A combination of cheeses works well with the chicken and BBQ flavor. I like to pre-cook my pizza crust--it allows the crust to cook through and the toppings are not over cooked. I think it is brilliant to add the chicken to the cooked pizza. If cooked chicken is allowed to cook another 8-10 minutes at 400 degrees you get chicken leather--not good. I like the pineapple cut in small pieces. I want pineapple in every bite. This is a great recipe. Enjoy!
Printable Recipe
Recipe from Family Favorite Recipes


Sunday, May 15, 2016

Roast Beef Dinner--by Greg


When our kids come to visit they always request a roast beef dinner cooked by their dad. Greg has this meal perfected. He makes the meat, gravy and mashed potatoes. I take care of the sides and the dessert. It is a perfect team effort.
When my health declined and Greg was released from his 5 year calling as a bishop of our LDS ward he suddenly had time on Sunday. He wanted to help with Sunday Dinner. He wanted to find a foolproof Roast Beef recipe, one that made delicious gravy.
My past attempts at this meal were sometime good, sometimes not so. I did what my Mom did--put a roast in a pan, cooked it for hours and hoped for the best. Sunday dinner was always yummy at Mom's.
Long story, we'll shorten it. So Greg wanted a recipe were he could have controlled results. Cook's Illustrated to the rescue. I had their cookbook The Best American Classics on my shelf. It had a simple pot roast recipe. From this recipe came The Perfect Roast Beef Dinner.
This recipe is not difficult but does require cooking time.

Perfect Roast Beef
1 boneless beef roast, about 3.5 pounds. We use rump roast but I'm sure you would have success with a pot roast or chuck eye roast
salt and pepper
2 tablespoons vegetable oil
1 medium onion, chopped
1 small carrot, chopped
1 small rib celery, chopped
2 cloves garlic, minced
1 teaspoon sugar
1 cup beef broth
1 cup chicken broth
1-1 3/4 cups water
Pat the roast dry with paper towel, sprinkle generously with salt and pepper. Heat the oil in a large heavy bottomed dutch oven, I use a le Cruset pan. When the oil is shimmering add roast and brown on all sides. This will take about 8 minutes. Transfer the roast to a large plate. Reduce heat to medium; add onion, carrot and celery to the pot and cook, stirring occasionally, until browning begins. Add garlic and sugar, cook until fragrant, about 30 seconds. Add the chicken and beef broths, scrapping the bottom of the pan with a wooden spoon to loosen brown bits. Return the roast and any accumulated juices to the pot. Add enough water to come halfway up the sides of the roast. Place a large piece of aluminum foil over the pot and cover tightly with a lid. Bring the liquid to a simmer then transfer the pot to the oven--heated to 300 degrees. Cook turning the roast every 30 minutes until tender. This will take about 31/2 to 4 hours.
Transfer the roast to a carving board, tent with foil to keep warm. Strain drippings. Allow fat to come to the top (we use a fat separator). Use drippings to make gravy. 
Gravy is simple--for every cup of drippings you need at least a tablespoon of fat (there is usually plenty of fat in the drippings). Mix 2 tablespoons flour in some water, whisk well, you don't want any lumps! Add flour/water mixture to 1 cup warm drippings. Bring to a boil stirring constantly. Let boil gently for 2 minutes. Adjust seasonings. We come from a long line of gravy loving ancestors. 1 cup of gravy would never do. Just increase amounts--keeping proportions the same. Today Greg made about 4 cups of gravy. He used 3 1/4 cup drippings, mixed 8 tablespoons flour with 3/4 cup water.


Sunday, March 27, 2016

Ham and Vegetable Chowder


There is nothing like a warm cup of soup on a cold Spring day. It is March, it is Spring Break, it is Easter Weekend--it is cold! The grandkids don't seem to mind the cold but they were happy to eat a warm cup of soup at the end of the day! This delicious soup was a hit. Everyone loved it from the 2 year old to grandpa.

Ham and Vegetable Chowder
1 1/2 cups diced ham--leftover Easter Ham works great
6 tablespoons butter
1 onion, diced (1 1/2 cups)
2 diced peeled carrots (3/4 cup)
2 stalks diced celery (3/4 cup)
2 cans chicken broth
5 Yukon Gold potatoes (1 3/4 lb.), peeled and diced
3/4 teaspoon oregano
1 bay leaf
salt and pepper
1 1/2 cups fresh corn kernels (or frozen)
3/8 tablespoons flour
3 cups milk (heat in microwave till hot)
1/2 cup cream
1/8-1/4 teaspoon Cayenne pepper
1 cup shredded cheddar/jack cheese
green onion, crumbled bacon, shredded cheese for garnish
In a large pot melt 2 tablespoons butter over medium heat. Add carrot, onion and celery. Saute till tender, about 4 minutes. Add chicken broth, potatoes, oregano, bay leaf. Salt and pepper to taste. Bring to boil, reduce heat to a simmer. Cover pan and simmer gently until potatoes are tender, about 10 minutes, stir occasionally. Reduce heat to warm, add ham and corn.
In a medium saucepan melt remaining 4 tablespoons butter over medium heat. Add flour and cook mixture for 2 minutes--stir constantly. Stirring constantly add hot milk, stir until mixture is thick.
Remove from heat, add salt and pepper to taste. Add cream, grated cheese and Cayenne Pepper.
Pour milk mixture into soup. Stir gently. Correct seasonings if necessary.
Garnish with bacon, green onions and cheese.
This yummy recipe feeds a crowd. Recipe inspired by Cooking Classy.
Printable Recipe


Monday, February 15, 2016

Broccoli Cheese Soup


After 40 years of cooking I finally found a recipe for Broccoli Cheese Soup that I like. I found it on one of my favorite blogs, Mel's Kitchen Cafe. It had a couple of hundred positive reviews so I thought I would take a chance. I made a few changes, it was excellent. I took it to a Relief Society Service Luncheon--there was nothing left, it got rave reviews. What made it wonderful? I think the combination of cheeses gave it great flavor and the fact that the broccoli was crisp tender gave it a great texture. I do know that I need to write the recipe down so I can make it again soon.


Broccoli Cheese Soup
1 can chicken broth
1 small onion diced
1/3 cup flour
4 tablespoons butter
1/2 teaspoon pepper
1/4 teaspoon salt
1/4 teaspoon seasoning salt
2 cups milk--heat in microwave for 3 minutes
6 ounces shredded cheese--part extra sharp cheddar, part Mexican blend
4 cups lightly steamed broccoli
1 cup lightly steamed cauliflower
Simmer diced onion in chicken broth in a covered saucepan for 15-20 minutes.
In a stock pot melt butter, add flour and seasonings. Cook, stirring constantly for 3 minutes.
Add warmed milk and whisk till soup thickens.
Add warm broth with onion, stir.
Add cheese, stir till melted.
Add steamed veggies.
Season if needed.
I just cooked my broccoli and cauliflower in the microwave for about 4 minutes. The recipe called for all broccoli, I didn't have enough so I added cauliflower. I think lightly steamed carrots would also be an excellent addition. Steamed diced Yukon Gold potatoes would be delicious or asparagus. Use a variety of cheese, sharp has great flavor and Jack or Mexican blend cheese melts wonderfully. I think this is a great basic recipe that could have many variations.
Printable Recipe

Sunday, December 6, 2015

Spaghetti Pie


Spaghetti Pie exceeded all my expectations. It is the best parts of lasagna and spaghetti. We loved it, the family I shared it with loved it and so did my mom. That is a lot of love. It does have a few steps but came together quickly. Next time I make it I will make the meat sauce in the morning. Then cook the noodles and assemble the 'pie' in the evening. Doing a bit of dinner prep in the morning is so helpful.

Spaghetti Pie
12 ounces thin spaghetti or vermicelli
1 pound lean ground beef
1 small onion, diced
1 clove garlic, finely minced
1 tsp. salt
1/2 tsp. pepper
28 ounce can crushed tomatoes
16 ounce tomato sauce
1 tsp dried basil
1/2 tsp dried oregano
4 ounces light cream cheese, softened
1/2 cup lowfat cottage cheese
3/4 cup Parmesan cheese
3/4 cup mozzarella cheese

1. Lightly coat a deep 9 or 10 inch pie plate with cooking spray and set aside.  Preheat the oven to 400 degrees F.
2. Cook the noodles until al dente according to package.  While the noodles boil brown ground beef. Add the onion, garlic, salt and pepper. Cook until the meat is cooked through.  Add crushed tomatoes, tomato sauce, dried basil and oregano.  Simmer the sauce over medium-low head for 10 minutes.
3. When the noodles are done, drain and return to the pot.  Immediately stir in the softened cream cheese and toss the noodles by lightly lifting them up and over with tongs until the cream cheese is mostly incorporated. Stir in the cottage cheese, Parmesan cheese, and the mozzarella cheese.  Toss until the noodles are evenly coated.  Stir in 3 cups of the red sauce.  Keep the remainder of the sauce warm on the stove.
4. Scrape the noodles into the prepared pie plate and using a flat spatula press the noodles evenly into the dish so they are tightly pressed together and evenly flat across the top. Sprinkle an additional 1/4 cup of Parmesan and mozzarella cheese on top.
5. Bake the spaghetti pie for 20-22 minutes, until it is hot and bubbly and the cheese is golden on top.  Let the dish rest for 10 minutes.  Cut into slices and serve with remaining red sauce.
--This makes 6-8 generous servings. Which is way to much for 2! It does reheat well so leftovers are great. I made 2 smaller pies and have one in the freezer for another day.
--The meat sauce was excellent on its own. It is easy to make and would be yummy on spaghetti.
Printable Recipe
Adapted from Mel's Kitchen Cafe


Monday, October 19, 2015

Oven Meatballs


These really are not beautiful, is it possible to take a good photo of meat?? But don't worry about looks because these are delicious. I am not a big meat eater, I have pretty high standards when it comes to ground meat. These come highly recommended from Mel's Kitchen Cafe. I am so glad I tried them--they are perfect for my meat eating boys and I enjoyed them too.
These little babies are very versatile. They make a killer Meatball Sub (recipe to come), we just enjoyed them with some fresh pasta and sauce. Just good food. They freeze well and it is easy to make a large batch. What's not to love?

Oven Meatballs
1 cup Panko crumbs
3/4 cup shredded Parmesan or mozzarella cheese (I do love options)
1/2 cup milk
1/2 cup beef or chicken broth (options again)
1/2 cup chopped fresh parsley
2 eggs, lightly beaten
1 1/2 tablespoons dried oregano
1 1/2 teaspoon salt
2 teaspoons pepper
2 teaspoons dried basil
1/2 teaspoon red pepper flakes
2 pounds ground beef
In a large bowl mix together all ingredients but the beef. Let the mixture sit for 10-15 minutes. Add the beef and mix gently. Yes, you need to use your hands. I love my disposable kitchen gloves. I can do more with these on!
Line rimed baking sheet with foil and lightly grease the foil. Form into golf ball sized meatballs--I use a cookie scoop, easy. You might need two baking sheets. Place meatballs an inch apart. Bake at 400 degrees for 20-25 minutes until cooked through. 
Be creative--use in most anything. Extra meatballs freeze well. Put in a freezer bag. Label and date. Most important--don't forget to use them!

Tuesday, July 14, 2015

Breakfast Burritos

 
Breakfast burritos are a favorite at our house and are a perfect quick meal any time of the day.  The filling can be made ahead of time and reheated for a quick delicious breakfast after a late night with family!
 
They are very versatile and can easily be altered to satisfy your preferences.  We have done a lot of experimenting - and this is currently our favorite breakfast burrito!
 
Breakfast Burritos
1 bag frozen shredded hash browns
1-1/2 lb Hot and Spicy Sausage, cooked. diced ham or cooked crumbled bacon would also work
4-6 eggs
1/2 cup salsa
cheese--shredded
sour cream
tortillas-flour or corn
Cooking frozen hashbrowns is somewhat of an art - one that requires patience and time! A 2lb bag needs to be cooked on a very large electric griddle, or in two batches in your largest stovetop skillet.  Spray the surface and drizzle with oil or butter.  With the griddle/skillet on medium heat add the frozen hash browns and DON'T TOUCH for 8-10 minutes. This is difficult, I know, but they will be so much better in the long run.  Season with salt and pepper. After 8 minutes check a small area, they should be lightly browned.  If you'd like them cooked more leave for a couple more minutes.  When cooked to your satisfaction carefully turn and the once again DON'T TOUCH, this time for 6-8 minutes.  You will end up with wonderfully cooked hash browns that aren't reduced to a mess of mushy potatoes (admit it, it's happened to you!).
Brown sausage.
Scramble eggs.
In a large bowl mix together the cooked potatoes, meat and scrambled egg. Add salsa. Mix gently. Heat either corn or flour tortillas, sprinkle on grated cheese to melt. Add mix, garnish with sour cream, hot sauce, more salsa etc. Roll up and serve hungry guests!
This is a perfect camping meal. If you are really lazy cook at home and bring mix ready to heat to your event. Just warm tortillas and serve. But if you love to cook out doors and don't mind the bugs, heat, dirt etc. by all means heat up a big griddle. This really comes together easily.
However you make it just enjoy the time you spend with loved ones!


Tuesday, May 26, 2015

Quick Cilantro Lime Chicken


Nothing better than a quick main dish that turns simple flavors into something amazing. This is certainly a 30-Minute Meal. To keep the meal really under 30 minutes add you favorite salad kit and some pre-cooked rice. Dinner doesn't get much easier.
 
Quick Cilantro Lime Chicken
2 chicken breasts--cubed
2-3 limes--zest one and juice all
4 cloves garlic--pressed
1/4 cup chopped cilantro 
salt
pepper
cumin
chili powder
cayenne pepper
Season chicken cubes liberally with seasonings--I would go lighter on the cayenne! Heat some olive oil in a pan until very hot. Add seasoned chicken, cook undisturbed for 3 minutes, when brown turn. Cook another few minutes until chicken reaches about 165 degrees. Add garlic and lime zest, cook for 30 seconds. Add lime juice and stir to release all the yummy goodness from the bottom of the pan. Top with cilantro.
Inspired by a recipe on this blog.


Wednesday, May 20, 2015

Singapore Chicken Salad


What is a Singapore Chicken Salad anyway??
I started with one of my favorite Asian Chicken Salads, made popular by my daughter Amber. This same sweet daughter introduced me to the wonderful world of Penzys Spices. They are fresh and have some of the most amazing seasoning blends. Actually in the near future I will do a post about some of my most used Penzys Spices.

Back to the 'Singapore Chicken Salad'. I purchased a small jar of Singapore seasoning. I knew it would be awesome because it contains some of my favorite spices--pepper, garlic, onion, coriander, cumin, ginger, fenugreek, nutmeg, cardamom etc. It worked miracles with the ever popular chicken tenders. These seasoned tenders added a wonderful flavor to a weeknight salad.
The homemade dressing makes up in just a minute from ingredients that are pantry essentials.
This salad is a little different each time I make it--depending upon what is in the fridge.
Have fun with this tasty salad!

Singapore Chicken Salad
I use Costco Chicken Tenders, 8 tenders fit well in my skillet and is enough for 2-3 servings. Thaw tenders, rinse and pat dry. Generously sprinkle chicken with Penzys Singapore Seasoning. Cook in a small amount of hot of hot oil for about 4 minutes per side or 165 degrees. Dice cooked chicken
Salad
Any mix of crisp veggies works.  I like Dole's Chopped! Asian Blend which contains green cabbage, red cabbage, broccoli slaw, carrots, kale and snap peas. There are so many fun salad blends available--it makes eating salad much easier. This hearty blend will also last a bit longer in the fridge than spring greens. Am I the only one that forgets what is in the fridge??
I might also add--
chopped romaine
Napa cabbage
diced cucumber
diced red pepper
green onions
bean sprouts
cilantro (a must)
orange sections
chopped peanuts or almonds
Won Ton Strips

Dressing
1/4 cup sesame oil
1/4 cup rice vinegar
1/4 cup sugar
1/4 cup vegetable oil
2 teaspoons salt
1/4 teaspoon pepper
Mix together--this dressing keeps for several days
Printable Recipe


Sunday, April 19, 2015

Bahama Chicken Soup and Tortilla Strips


I have never been to the Bahamas but I can see myself sitting under a coconut tree enjoying this flavorful soup. I found the recipe in a 30 Minute Meal cookbook by a local Utah author Shauna Evans.  I marked several recipes that look interesting.
The trick to making this meal in 30 minutes is to have a Rotisserie chicken on hand. I didn't have one but quickly cooked some frozen chicken tenders (that I always have). I added more veggies and cut the recipe down so we only ate it for 3 meals.
I had my doubts about the Tortilla Strips--I usually purchase packaged Wonton or Tortilla Strips but I didn't have any on hand and I did have some close to date tortillas in the fridge. The garlic butter gave them a great flavor and they really did get crispy.
I was happy with the final dish and quickly wrote the recipe down so I could share it with you.
Here is my version of:
Bahama Chicken Soup
1 tablespoon olive oil
3/4 cup diced onion
1/2 cup diced red or yellow pepper
2 cloves garlic, minced
1 tablespoon seeded and minced jalapeno pepper
3 cups chicken broth
1 can unsweetened coconut milk
1/2 can petite diced tomatoes--or 2 diced Roma tomatoes
1/2 can diced green chilies
2 cups diced cooked chicken, seasoned with salt and pepper
1/2 cup diced carrots
1/2 cup chopped cilantro
1/4 teaspoon salt
1/4 teaspoon pepper
juice from 1 lime
In a stockpot heat oil over medium heat. Add onions, red peppers, garlic and jalapeño. Cook until softened, about 4 minutes.
Add chicken broth, coconut milk, tomatoes, green chilies, carrots, salt and pepper. Cook on medium low heat until carrots are crisp tender.
Add cilantro and lime juice.
Garnish with Tortilla Strips.


Tortilla Strips
4 tablespoons butter, melted
1/2 teaspoon garlic powder
1/2 teaspoon salt
flour tortillas
Mix melted butter, garlic and salt. Brush on both sided of tortillas. With a pizza cutter, cut in 1/2 inch strips. Spread on a cookie sheet. Bake at 400 degrees for 8 minutes, turning once.
Printable Recipe


Sunday, April 5, 2015

Creamy Chicken Picasso


I have had this delicious looking chicken dish pinned for ages. I found it on Let's Dish--one of my favorite blogs, Dani has some awesome recipes. This chicken dish was no exception. Candise was visiting and we made this for Easter dinner. It might not be your typical Easter Dinner, but it was colorful and fresh. Perfect for a spring meal.
The chicken was tender, the onions and peppers were yummy. We spooned the tomato cream sauce over angel hair pasta. And we tried not to lick our plates because it was Easter. Please don't wait till next Easter to make this dish. I will add it to the 'make often' recipe list.


Creamy Chicken Picasso
4 tablespoons butter, divided
4  boneless, skinless chicken breasts
1 medium onion, sliced
2 peppers (red, orange or yellow), cut into rings
3 cloves garlic, pressed
1 can (14 oz) crushed tomatoes
1/2 cup chicken broth
1 cup heavy cream
pinch nutmeg
salt and pepper to taste
1 1/2 cups Monterey jack cheese, grated

Preheat the oven to 400 degrees.  Season the chicken with salt and pepper, melt  2 tablespoons of the butter in a skillet and brown the chicken lightly on each side. Transfer to a greased 9x13 pan. Add 1 tablespoon of butter to the skillet, add the onions, season lightly, and cook until soft and browned.  Arrange the onions over the chicken.  If needed add the last tablespoon of butter to the skillet, add the peppers, season lightly, and cook until softened.  Add to the 9x13 with the chicken and onions. Add the garlic to the pan and cook until fragrant, about 30 seconds.  To the garlic add the tomatoes, broth, cream, salt and pepper, and nutmeg.  Simmer the sauce for 5 minutes, stirring occasionally, until slightly thickened.  Pour the sauce over the chicken and vegetables.  Cover with foil and bake 20-25 minutes. Remove from the oven and remove foil.  Top with grated cheese and return to the oven, uncovered, until cheese is golden brown and chicken is cooked through. Serve with pasta if desired.
Printable Recipe


Thursday, April 2, 2015

Pork Tenderloin with Pan Sauce


Can I just tell you right now that this is the best meat I have ever eaten! I made it three times in March and it will probably go on the menu again this week. It is tender and delicious. The pan sauce is what dreams are made of! Please make it soon.
Pork tenderloin is usually sold in a package of two, each tenderloin weighs close to a pound.  You can figure 4 ounces per serving so each tenderloin serves 4. This is a perfect weeknight meal for hubby and I. Leftovers make a gourmet lunch--the only way to 'brown bag'. 
Don't be tempted to over cook the tenderloin. It will cook in 20 minutes or less. I love my quick read thermometer. Your meat will be tender and delicious cooked to 145 degrees. Tent with foil and let is rest for five minutes.
So I just might make this again tomorrow!

Pork Tenderloin with Pan Sauce

Marinade
1/2 cup oil
1/3 cup soy sauce
1/4 cup red wine vinegar
juice of one lemon
1-2 Tbsp Worcestershire
1-2 Tbps chopped fresh parsley
2 tsp dried mustard
freshly ground black pepper
4 cloves fresh garlic, minced
1 lb pork tenderloin, silver skin removed

Combine all marinade ingredients and reserve 3 tablespoons. Place pork tenderloin and marinade in a Ziploc baggie and let marinate for at least 3-4 hours.

Preheat oven to 350 degrees. In a hot skillet over medium-high heat sear each side of the tenderloin for 2-3 minutes. Place in the oven and cook for 20 minutes until meat has reached 145 degrees.  Remove from oven and let rest at least 5 minutes before slicing.

Pan Sauce
Pan scrapings from pork tenderloin
1/2 cup chicken broth
3 Tbsp. reserved marinade
1-2 Tbsp. butter

Meanwhile, place the skillet back on the stove on medium heat. Add the chicken broth and whisk to de-glaze the pan of all the yummy bits left after you browned the tenderloin. Add the marinade, bring it to a boil and reduce 3 minutes. Remove from heat and add the butter.  Stir until the butter has melted. Pour over the tenderloin and serve.
Printable Recipe
Thank you Chef Mommy for this delicious dish!

Thursday, February 19, 2015

Noodle Salad with Spicy Peanut Sauce


This delicious Salad comes from Epicurious. I read over 80 reviews, studied the recipe and came up with one delicious version. I think it just may become a family favorite. Great for a light meal, add cooked chicken or shrimp for a more filling dinner.
The actual Peanut Dressing was to die for--the kind you just might find yourself licking the spoon. It came together in 30 minutes. You could make the dressing the day before but I would dress the noodles just before serving. Most testers liked the salad at room temp--I thought it was delicious just lightly warmed. Looks like a meal with many options--make it yours!

Spicy Peanut Sauce
6 tablespoons peanut butter
1/4 cup chicken broth (I used a little bullion and water)
3 tablespoons rice vinegar
3 tablespoons soy sauce
1 1/2 tablespoons sugar
1 tablespoons sesame oil
1 tablespoon fresh grated ginger root
1 teaspoon sriracha hot chili sauce
juice from 1 lime
Mix together with a whisk or an immersion blender. If it to thick either heat it for a moment or add a little more broth. I thought it was great as is.
Salad
6 to 8 ounces thin spaghetti cooked al dente, pour in a colander, drain, rinse with cold water and drain again. I used 6 ounces because I want plenty of dressing on my salad. Cook more pasta for a lighter dressed salad.
To cool pasta add:
 2-3 cups veggies. I added red and yellow peppers cut in slivers. julienned carrots, shredded cabbage, shredded Napa (I used a couple of cups of greens from a (Costco Oriental Salad--easy)
1/2 cup sliced green onion,
1/2 cup chopped cilantro
1/2 cup chopped salted peanuts
Add dressing to pasta and veggies. Top with cilantro, peanuts and green onions.
Enjoy!
Printable Recipe


Wednesday, February 4, 2015

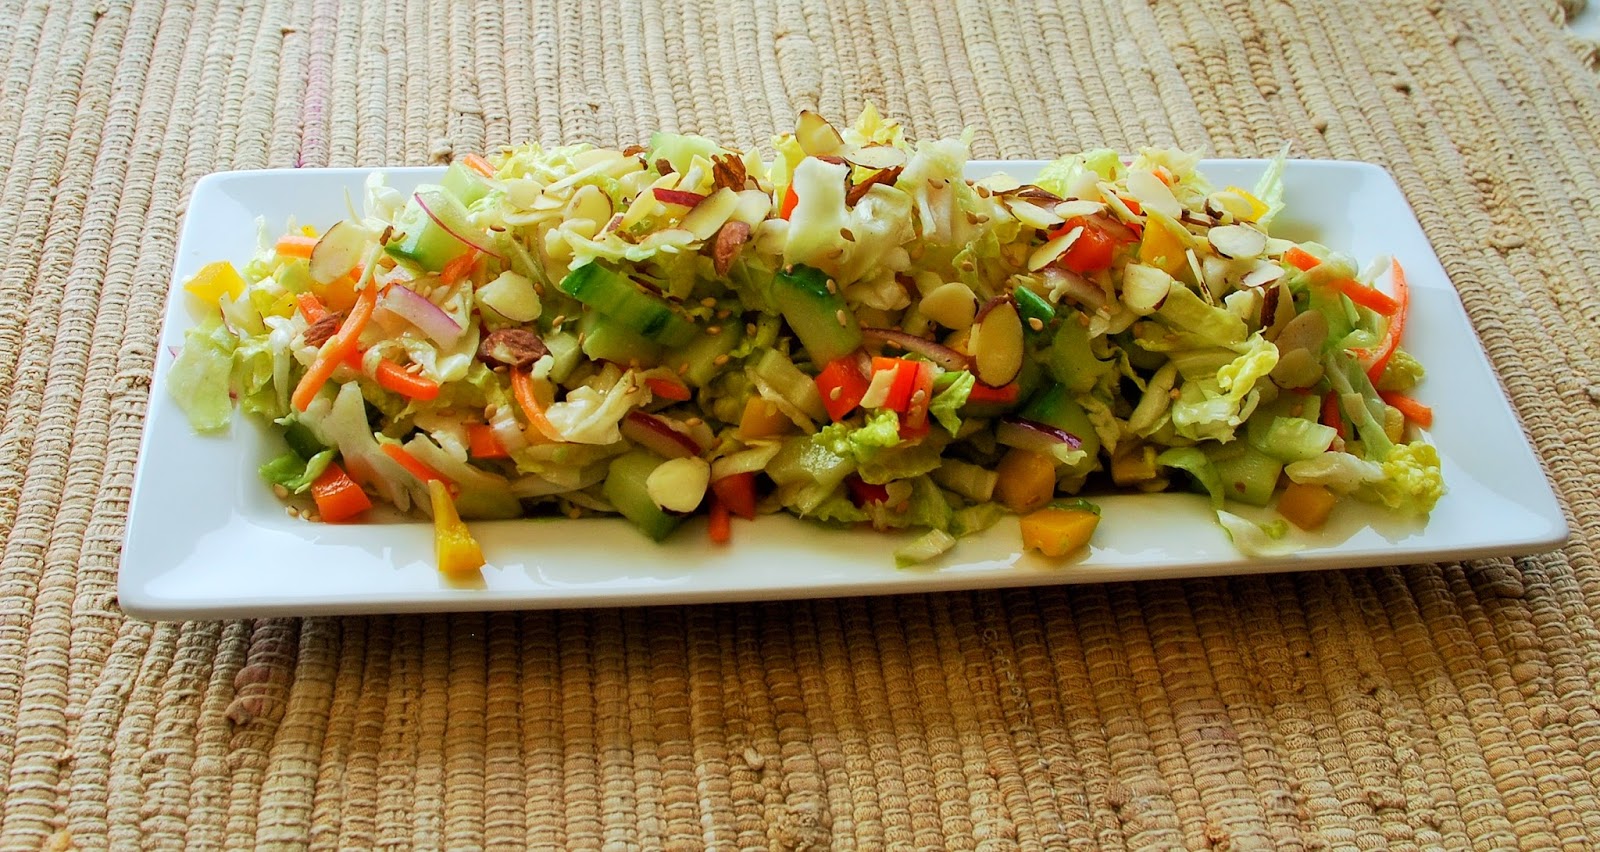
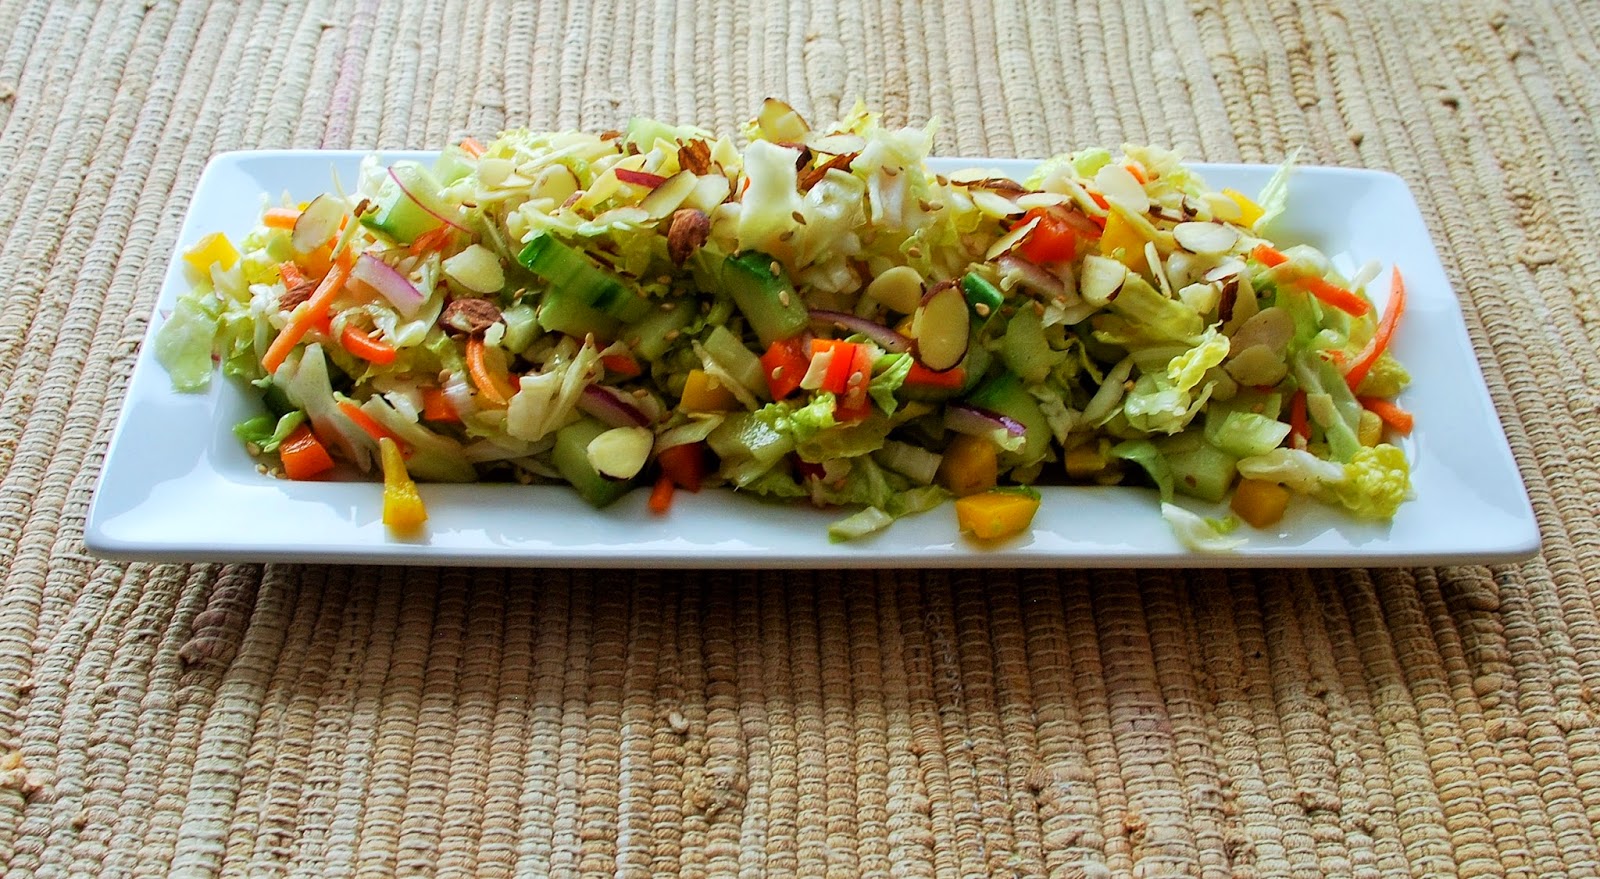
Asian Chop Salad


I am happy with the variety of 'chop' salad kits at the market. I do purchase them occasionally and if fresh they can make a delicious salad. I wanted to see if I could come up with a 'better' chop salad. I think you will agree that this is one excellent salad. This salad is full of texture and flavor. The dressing is light with just a little sweetness. Combine the salad and dressing for a perfect dish.

Asian Chop Salad
1 bag coleslaw mix (14-ounce)
Chopped:
Napa Cabbage
celery
cucumber
red pepper
green onion or red onion
bean sprouts
sugar snap peas
1 tablespoons toasted sesame seeds
1/3 cup slivered almonds
Mix coleslaw and veggies in a large bowl, toss with dressing at least 30 minutes before serving. The dressing will draw some moisture out of the veggies, this really is enough dressing. Just before serving top with sesame seeds and almonds.

Dressing
2 tablespoons canola oil
2 tablespoons cider vinegar
1/4 cup rice wine vinegar
2 tablespoons sugar
1 teaspoon salt
2 teaspoons soy sauce
1/4 teaspoon garlic powder
1/4 teaspoon black pepper
1/2 teaspoon sesame oil
Combine all ingredients and shake or stir vigorously. Refrigerate until ready to use. This dressing can be made several days before serving.
Printable Recipe

You can use finely sliced cabbage and grated carrots instead of coleslaw mix.
Use whatever veggies you have. I like this salad because most of the ingredients keep well in the fridge. Cabbage, carrots, celery, onions have a long life span. This salad is excellent with just these!
Napa Cabbage keeps quite a while in the refrigerator, it adds a delicious flavor and a 'softer' crunch. Fresh bean sprouts have a short shelf life--but are delicious if you have them.
I didn't put amounts in this salad--use more of what you love!
I found this recipe in an Our Best Bites cookbook, I made a few changes to make it more to my liking.

Sunday, January 11, 2015

Crock Pot White Chicken Chile


I think Crock Pot meals were invented to help ease the 'witching hour'. That time between about 4 and 6 PM when life falls apart. Kids are cranky, (not just pre schoolers), everyone is hungry and Mom is franticly scanning thru Pintrest looking for easy dinner ideas.
 Welcome the Crock Pot. Dinner is slowly cooking, the house smells wonderful. Family members know dinner is near because they can smell it. Mother can play games with toddlers or help youngsters with homework, because she already knows what's for dinner. Yes, the Crock Pot is a wonderful invention, maybe a life changer.
 Valyn Baker served this White Chicken Chile at the Ward Christmas Party, people begged for the recipe. She directed the droves to this link in the LDS Living Magazine. Here is my take on this recipe, I have served it several times with positive reviews.

Crock Pot White Chicken Chile
10 frozen chicken tenders
1 cup Salsa Verde--I used Herdez brand
I tried to find the difference between Salsa Verde and Green Enchilada Sauce. I have both sitting in front of me. I went with the Salsa Verde because it has less ingredients I can't pronounce. They look similar, I think either could be used in this recipe. Anyone know more on the subject?
2 cans chicken broth
1 onion diced
2-3 cans white beans, drained and rinsed
1/2 teaspoon garlic powder
2 teaspoons cumin
1 teaspoon oregano
1/2 teaspoon salt
1 cup sour cream
1/2 cup minced cilantro
Put frozen chicken tenders in crock pot add Salsa, chicken broth, beans and seasonings. I know the purpose of a crock pot meal is quick cooking. So if you want to just put the onion in I'm sure the cooking police will not come for you. However, I have found that onion sometimes takes forever to soften in a crock pot. I sauté the onion in a little olive oil for about 5 minutes and then add it to the crock pot. It smells great and adds a deeper flavor to the soup.
We use the crock pot for long slow unattended cooking. I did just that for years and tried to develop a palate for dried out chicken. This recipe cooks for about 2-3 hours on high. Chicken is done at 165 degrees. It will be flavorful and juicy. Remove chicken from the crock pot, shred it with 2 forks and return. Add sour cream and stir till combined. Top with cilantro and serve with corn bread, tortilla chips or strips.
 All crock pots cook differently, adjust. Chicken tenders cook quicker than chicken breasts. Thawed chicken cooks quicker than frozen. So many variables. The only truth in crock pot cooking is that chicken should not have the same texture as jerky! Enjoy. This really is a simple, delicious recipe.
Printable Recipe

Wednesday, November 5, 2014

Crispy Halibut


This is our favorite way to eat halibut. My mother, who does not like fish at all, is always happy to come to Sunday Dinner when I serve crispy halibut. This is so simple I can hardly call it a recipe--but I had to share it! We have over 50 pounds of halibut in the freezer so this dish will appear often.
Serve it with Homemade Tarter Sauce and a lemon wedge. It is simply delicious.

Crispy Halibut
1 pound halibut--sliced 1/2 inch thick
1/2 cup Panko crumbs
1/2 cup cornmeal
salt and pepper
1 egg, beaten
2 tablespoons water
vegetable oil
Mix together panko crumbs, cornmeal, salt and pepper. Put in a shallow dish. Mix together egg and water, put in a shallow dish. Dip halibut slices into egg mixture then into Panko mixture. Heat about 1/4 inch oil in a large skillet to 350 degrees. Gently place breaded halibut into hot oil. Cook about 2 minutes on each side. Put cooked halibut on a plate lined with paper towels. Serve with lemon juice and tarter sauce.
Printable Recipe

Tuesday, October 28, 2014

Quiche for Two

I do wish Quiche was a bit more photogenic! But, you will have to trust me--this is delicious. I like quiche, actually I really like quiche. I just don't like it for several days in a row. Enter, 'Quiche for Two'. Some brilliant chef decided that you really could cut a quiche recipe way down and put it in a small casserole--rocket science I know.
Really this is a great recipe, it is crust less which is fine by me.  I'd rather forgo a high calorie crust and eat a brownie! There are so many ways to change this recipe--use what you have in your fridge. It will always be yummy. This recipe came from a Pampered Chef Cookbook. I don't know which one, as I have a tendency to rip recipes out of cookbooks, do you do that??


Quiche for Two

Base:
3 eggs
1/2 cup half and half
1/4 tsp salt
2 Tbsp all purpose flour
Ground black pepper

Filling Options
3 slices crisply cooked bacon, 1/3 cup seeded, chopped tomato, 2 Tbsp thinly sliced green onion, 1/2 cup shredded Swiss cheese
OR
1/2 cup chopped ham, 1/3 cup chopped fresh broccoli, 2 Tbsp finely chopped onion, 1/2 cup shredded sharp cheddar cheese

Protein, vegetable, cheese

Preheat oven to 375 degrees.  Spray small oval baker with nonstick cooking spray.  Whisk together base ingredients, set aside.

Combine fillings and cheese, spoon into the bottom of the baker.  Pour base over filling ingredients.

Bake 30-35 minutes or until the center is set.  (A knife inserted will come out clean.)  Let stand 5 minutes before serving. 
Printable Recipe


Thursday, October 9, 2014

Panko Crusted Salmon--30 Minute Meal


Hubby spent a wonderful week in Alaska on my brothers fishing boat. He came home with 150 pounds of seafood! This Panko Crusted Salmon is amazing. It is quick--yes a true 30 minute meal. Heating the oven to 425 takes a few minutes so plan ahead. This is what I call 'fast food'. If you don't have a freezer full of salmon check out the frozen salmon at Costco, it is consistently good.

Panko Crusted Salmon from Pink Parsley
2/3 cup panko crumbs
2 Tbsp minced fresh parsley
2 tsp grated lemon zest
kosher salt
freshly ground black pepper
olive oil
4 (6-8 oz) salmon fillets, skin on
3 Tbsp Dijon mustard
lemon wedges

Preheat the oven to 425.

In a small bowl combine the panko, parsley, lemon zest, 1/2 tsp salt, 1/2 tsp pepper, and 2 Tbsp olive oil. Stir until the crumbs are evenly coated and set aside.

Place the salmon filets skin side down on a board.  Brush with the Dijon mustard, then season with salt and pepper. Press the panko mixture thickly on top of each filet.

Heat 1 Tbsp of oil in an oven proof skillet over medium high heat. Wait for the oil to be very hot, and then gently add the salmon filets, skin side down and sear for 3-4 minutes, without turning.

Transfer the pan to the oven for 5-7 minutes until the salmon is almost cooked through and the panko has browned. You may need to turn the broiler on for the last minute or two to brown the panko. Remove from the oven and loosely cover with foil.  Allow to rest for 5-10 minutes.  Serve with lemon wedges.
Printable Recipe