Monday, September 17, 2012
Fresh Tomato Basil Pasta
There is nothing like getting a new cookbook to rekindle your cooking excitement. Thanks to Amazon Prime I can have a new cookbook soon. I do love instant gratification, I don't wait really well. So I guess the cookbook I purchased was just right for me it is Giuliano Hazan's Thirty Minute Pasta--100 quick and easy recipes.
My good friend Kayte has been singing praises for this cook book for ages now. She and a few friend make a new recipe each week and post on the same day. It is pretty casual but it is always fun to see what they post. So I purchased the cookbook and there really are recipe after recipe of very simple pasta meals.
My first recipe had to be one that utilized my garden fresh tomatoes and fresh basil. These two items won't last much longer. The recipe was easy and delicious. Kayte said she cooks extra pasta and keeps it in the fridge. Getting dinner on the table becomes that much quicker.
I will give the recipe as I made it--just a few variations that didn't change the outcome.
Angel Hair Pasta with Fresh Tomato, Olive Oil and Basil
2 pounds fresh ripe tomatoes
4 garlic cloves
3 tablespoons extra-virgin olive oil
1/8 teaspoon red pepper flakes (scant)
10 fresh basil leaves
8 ounces cooked pasta
Drop the tomatoes in boiling water, leave for 60 seconds. Remove and run under cold water, skins will slip right off. Dice tomatoes in 1/2 inch dice
Peel and thinly slice the garlic. Put the garlic, 2 1/2 tablespoons of olive oil and red pepper flakes in a 12 inch skillet. Place over high heat. The moment the garlic begins to sizzle add the tomatoes and season generously with salt. Cook for 15 minutes, stirring occasionally until most of the liquid has evaporated. Coarsely shred the basil and add to the sauce. Continue cooking until all the liquid is evaporated.
Add the sauce to pasta that has been cooked in salted water until al dente. If you are using pasta that has been cooked earlier in the day or week either submerge in hot water for a moment or microwave till hot. Serve sauce with pasta. Drizzle individual serving with olive oil, we also added pepper. We added a sprinkle of fresh grated parmigiano reggiano cheese. It was delicious. I served it with crisp bakery toast. It was a very filling meal.
This amount of sauce made 4 adult servings. But the recipe called for 16 ounces of pasta for 4 servings. 8 ounces was plenty of pasta for us.
Will I make it again--yes! You just can't go wrong with fresh tomatoes and basil.
Friday, September 14, 2012
Autumn Granola
I have 6 granola recipes on my blog, do I really need one more? Yes I do. This beautiful granola gets it's fall colors from some delicious dried fruit that I purchase from King Arthur Flour. It is their Fruitcake Blend but don't let the word fruitcake scare you. This is my favorite blend of dried fruit because the pieces are small but the flavor isn't. It contains dried pineapple, golden raisins, apricots, cranberries and dates. Beautiful little bites of fall. I made two batches, one for me and one to share. Who doesn't like a bag of homemade granola.
Autumn Granola---inspired by Cooking For Seven
4 cups oatmeal
1 cup coconut
1 1/2 cup nuts (I used walnuts but use what you love)
1/4 teaspoon salt
4 ounces butter (melted)
1/4 cup pure maple syrup
1/4 cup honey
1 tablespoon pure vanilla
1 cup dried fruit
Mix oatmeal, coconut, nuts and salt in a large bowl. Melt butter, add syrup, honey and vanilla. Pour over oat mixture and stir well. Spread on a sheet pan. Bake at 300 degrees for 30-40 minutes. Stir often. When granola is cool add dried fruit.
Labels:
almonds,
apple,
blueberries,
breakfasts,
brunch,
coconut,
cranberry,
dessert. pecans,
dried fruit,
granola,
oatmeal,
pecans
Tuesday, September 11, 2012
Peanut Butter Granola
I had been baking one day and my sweet niece stopped in to sample my creations. The Peanut Butter Bars are always a hit. I made a batch of brownies that although not bad didn't make the blog cut. We came to the Peanut Butter Granola--I had Lacy sample it (now Lacy is expecting so factor that in). She like it, she really liked it. I suggested that I would probably serve it with fresh fruit and Greek Yogurt. She smiled and said, I think it would be good on ice cream! Lacy was right on. It was delicious on Vanilla Bean Ice Cream with a drizzle of chocolate! Yes, I also enjoyed it for breakfast with yogurt and fruit. However you serve it, it's delicious. Inspired by a recipe on Liv Life.
Peanut Butter Granola
4 cups oats
6 tablespoons ground flax meal
1/2 teaspoon salt
1 cup creamy peanut butter
1/2 cup brown sugar
drizzle of honey
2 teaspoons vanilla
2 egg whites, lightly beaten
Mix oats, flax meal and salt. Set aside. On low heat warm peanut butter, brown sugar and honey. Add vanilla. Mix with oatmeal stir well. Stir in egg whites. Spread granola on sheet pan. Bake at 325 for 20-30 minutes stir once. I like my granola crispy so I baked it a little longer.
Labels:
breakfasts,
brunch,
dessert. pecans,
granola,
oatmeal,
peanut butter
Monday, September 10, 2012
Chocolate Peanut Butter Cookies and The Night Time Baker!
Coming home from school was my favorite part of the day. Mom was always home, as soon as I opened the door I knew just what she had been doing. More often than not wonderful smells hit me. Chocolate cake, cookies, fresh bread, cinnamon rolls and maybe in winter a pot of beef stew. School cares were left at the door as we ate a home baked treat and chatted about our day.
I do think the power of smells is magical.
We had been married about 13 years, we had 6 small children and hubby was the mayor of our very small but rapidly growing town. He had meetings every week--oft times the meetings would get heated, tempers flared. My mild mannered hubby put up with this surprisingly well. I wanted home to be a place of love and happiness--and good smells! Hubby's meetings often went till late at night. I think that is when I became the "night time baker". I remembered my childhood and how troubles seemed to melt away at the smell of good food. So I put it to the test. Luckily my kids had early bedtimes. Once they were asleep the kitchen came to life. I would make brownies one night, cookies another and occasionally sweet rolls with caramel frosting.
Hubby opened the door from his harried meetings and a waft of delicious smells greeted him. I'm not saying all his problems disappeared but a waft of deliciousness met him at the door.
Why this ramble down memory lane? Hubby spent a week in Alaska, he didn't get home till 10 PM. I started these yummy Peanut Butter Chocolate cookies at 9. He opened the door to hugs, kisses and a waft of sweetness. That is a good thing! And these are one delicious cookie. Very soft--don't be tempted to over bake. The drizzle of chocolate is the perfect finish. These would be yummy any time of the day or night!
Chocolate Peanut Butter Cookies
1 1/3 cup flour
1 teaspoon baking soda
1/4 teaspoon salt
1 cube butter (4 ounces)
2/3 cup smooth peanut butter
1/2 cup granulated sugar
1/2 cup brown sugar (3 1/2 ounces)
1 egg
2 teaspoons vanilla
In a small bowl whisk together the flour. baking soda and salt.
In your mixer put softened butter, peanut butter and sugars. Mix about 3 minutes. Add the egg and vanilla and mix well. Gently stir in the flour mixture. Please don't over mix. Bake at 350 degrees on parchment lined stoneware. Did you know you can get huge rolls of parchment paper at Costco. It's by the plastic wrap and foil. I do love my big roll of parchment paper!
I use my small Pampered Chef Scoop for these little gems. I did flatten them slightly before cooking. Bake for 9-11 minutes. My cookies needed the 11 minutes. Cool cookies for a few minutes on the sheet pan--they have to set up. When they can be safely moved to a cooling rack you are ready to pop them in the freezer for a few minutes. I'm usually in a hurry and the freezer is my friend! This batch makes about 3 dozen smallish cookies.
For the drizzle put 1/3 cup milk chocolate chips and 1/3 cup semi sweet chocolate chips in a heavy duty zip lock baggie. Add a heaping teaspoon of Crisco. Seal the bag and melt in microwave. My micro wave has a setting for melting chocolate--I love it. Without a setting just melt it at 50% power and stir every 30 seconds. When chocolate is warm, melted and very squishy--mix it together good. Cut a very, very small hole in the corner of the baggie. Pretend like you are on Cup Cake Wars and drizzle the now cold cookies. Have fun--you get to play in your food! Let the chocolate harden and serve. Or just enjoy before they are cool--they may be messy!
This recipe was inspired by Cooking Classy a blog I found while looking at quilting blogs. I have no idea how I found it!
Labels:
chocolate,
cookies,
cupcakes,
dessert.,
dessert. pecans,
family,
frosting,
peanut butter
Tuesday, September 4, 2012
Witchy Pillow!
I've always enjoyed doing needlework. Sometimes more than others. My sweet friend introduced me to this cute pillow. I went right to the fabric store and bought a couple of kits. My daughter spent a few days with me so we started these cuties.
As with most cute projects I want to share them with my daughters and daughters in law. Before I know it I'm thinking I need to make 6 or 7 pillows. I' ve got two done--several more to make. But aren't they darling.
Better get busy!
Nectarine Upside-down Chiffon Cake--TWD BWJ
We celebrated Hubby's birthday late--a month late to be exact. That's what happens when a birthday falls just days before a child's wedding. Normally I would just make a chocolate bundt cake or something tried and true. Thanks to this wonderful baking group I had the challenge to make something new and different.
I read the recipe thru several times--it does need a little thought and planning.
But can I just say for the record that this Nectarine Upside-down Chiffon Cake was absolutely delicious. It was like nothing I've ever tasted (maybe I should get out more)! The nectarines and brown sugar made a beautiful topping. The Chiffon Cake part was light and delicious. The streusel was good but if I made the recipe again I would leave it out so I could just enjoy the cake. The baked streusel was tasty and I see many uses for it. Like atop blueberry muffins or on top of fresh peach ice cream. I really don't lack in the dessert department!
All in all I'm glad I made this recipe, glad I tried something slightly out of my comfort zone. Very happy to have a well written cookbook that walks me right thru a dessert such as this. We were all happy to have a delicious late birthday cake!
The complete recipe can be found on Marlise's and Susan's blog. It really is worth making.
Sunday, September 2, 2012
Sponge Fun--Happy Mail
School has started for my Grand Kids, it's still hot and the pool is closed. So I sent them a 'water fight'! Each child will receive a sponge, all they have to do is add water. It will be a perfect way to cool down after school. Each sponge weighed in at 3 ounces. A 3 ounce package costs $1.95 to send. Hopefully this will bring a smile to their sweet faces.
Giverslog has a lot of fun ways to send mail. Keep it under 13 ounces and drop it in any mailbox. Brighten a child's day with 'happy mail'!
Wednesday, August 29, 2012
The Great Outdoors
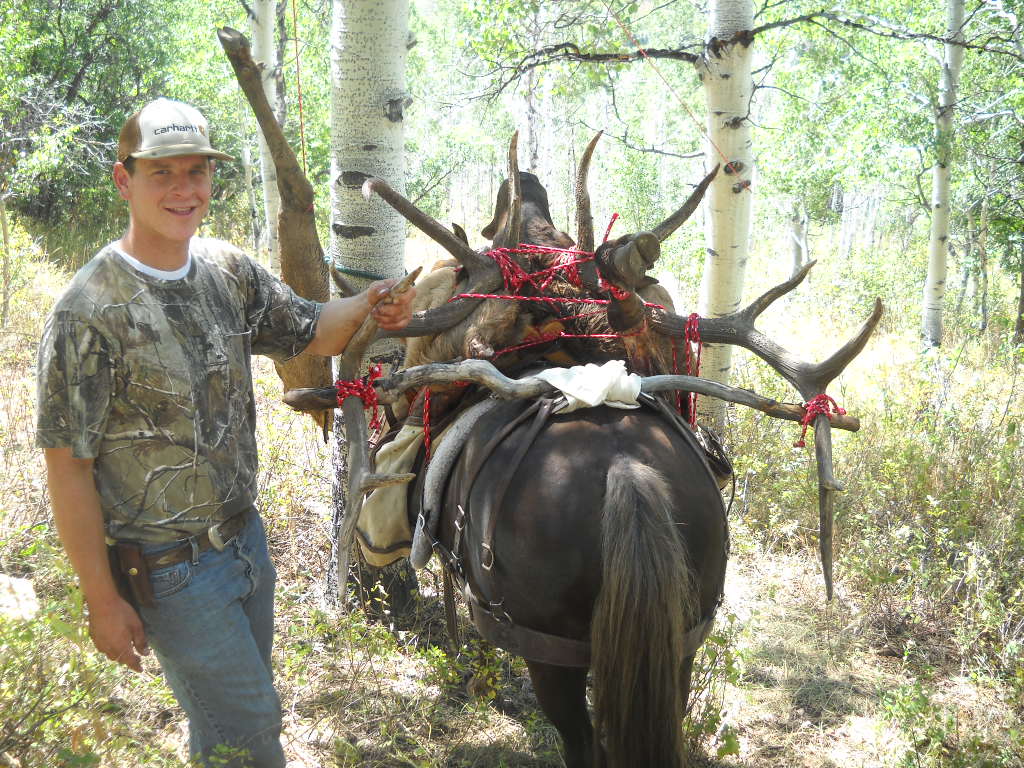
I do love the great outdoors--from a distance. When our children were young I camped--in a 23 foot trailer. My idea of a wonderful outdoor experience is a picnic. But I'm not opposed to family members enjoying the great outdoors. My guys love to hike, hunt, backpack, shoot, fish etc. I encourage it, I just don't participate in it and that's okay.
So Max had one great adventure. He put in for an archery elk tag--knowing he wouldn't get it. It's a draw and chances are small that you will 'win'. But Max seems to have good luck and he did draw out for the 'once in a lifetime' elk tag. The 'hunt' started the week after Max got home from his honeymoon, bad timing but afterall it is a 'once in a lifetime' hunt.
Max spent many hours tracking elk, putting up trail cams and hiking all over the mountains. All his hard work paid off. He was successful. He shot the prize elk with an arrow no less. It is big--very big, Max is happy and I'm sure the new bride is happy because the hunt is over! They say it's 'once in a lifetime'. Yeah right.
Monday, August 27, 2012
Oatmeal Fudge Bars
My sweet friends son just returned from serving a 2 year mission for our church. He has been serving in the Bangkok Thailand Mission. Today he was speaking in church--giving a short report of some of the experiences he has had. Carol was having a houseful of guests for lunch so I happily offered to make some treats. I look for opportunities to share the calories!
I checked my Pinterest boards and many blogs looking for a good treat. Bars are fun, they make a lot and your oven is only on for a short time, a plus in 95 degree heat.
This bar has a simple oatmeal cookie type crust, a decadent chocolate filling and a light crumb crust. All combined to make one delicious treat. I found the recipe on Brown Eyed Baker, one of my favorite blogs. It's a recipe worth keeping.
Oatmeal Fudge Bars
1 cup quick-cooking oats
1 ¼ cups light brown sugar, divided
1 cup all-purpose flour, divided
¼ tsp baking powder
¼ tsp baking soda
¼ tsp salt, pinch of salt, divided
10 Tbsp unsalted butter, divided
1 ½ cups chocolate chips
¼ tsp baking powder
¼ tsp baking soda
¼ tsp salt, pinch of salt, divided
10 Tbsp unsalted butter, divided
1 ½ cups chocolate chips
1 egg
Preheat oven to 325 degrees. Line an 8 inch square baker with aluminum foil, allowing excess to hang over the edges of the pan. Grease foil; set pan aside.
Combine the oats, 1 cup of brown sugar, ¾ cup of flour, baking powder, baking soda, and a pinch of salt. Stir together in a bowl to combine. Melt 8 Tbsp butter and stir into the oat mixture until combined. Reserve ¾ cup of the mixture for the topping.
Sprinkle the remaining oat mixture over the bottom of the prepared pan and press into an even layer. Bake until light golden brown, about 12 minutes. Cool completely, about 1 hour.
Combine the remaining ¼ cup flour, the remaining ¼ cup brown sugar, and the remaining
¼ tsp salt in a bowl. Set aside.
Melt the chocolate chips and the remaining 2 Tbsp butter in a large bowl, microwaving at 50% power in 30 second intervals, stirring after each. Let cool slightly. Add the egg and whisk until combined. Use a rubber spatula to fold in the flour mixture, stirring until just combined.
Pour the chocolate filling over the cooled crust and sprinkle with the remaining oatmeal mixture. Bake until a toothpick inserted into the center comes out with a few moist crumbs attached, 25-30 minutes. Cool completely on a wire rack. Using the foil overhang, lift the bars from the pan and cut into squares. Store leftovers in an airtight container at room temperature.
Saturday, August 25, 2012
"Now That's Eggciting"
I have been playing with rubber stamps for the better part of 20 years. Just something I like to dabble in. I'm not really a saver--my craft room can only hold so much. So I'll purchase a stamp set play with it for a time and when I get tired of it I will give it to someone else who will love it. Styles change--designers are always coming out with something new and different.
I had a set years ago, played with it for a time and then passed it on.
Guess what I missed that set! Of course it was not available. So I
scoured E-bay (most everything is on E-bay) and found it for a fair
price. What is this set that makes me smile every time I use it?? "Best of Cluck" by Stampin' Up!
For some reason having chickens seem to be the 'in' thing today. So I have plenty of friends that will enjoy these 'corny' cards!
Monday, August 20, 2012
Popovers--TWD/BWJ
I can't believe I've been cooking for over 40 years and have never made Popovers. They are a magical dish that any child would love and sophisticated enough for an adult. I deem Popovers the perfect food!
A few simple ingredients and a hot oven are all you need to create Popovers. They can be made in a muffin tin or custard cup. You can also buy a special Popover pan--I could be tempted.
They are so simple, don't wait any longer to make this yummy dish.
Our hostesses this week are Amy and Paula, check their blogs for the complete recipe. Sunday, August 19, 2012
German Chocolate Cake
This is Cindy's daughter, Candise. I have forever said that I want to be JUST like my mom when I grow up and today I just might be one step closer.
I grew up with grandparents nearby and many Sunday evenings were spent visiting. I don't live in my hometown anymore and don't get to see my grandmas often enough. We have tried to 'adopt' some grandparents wherever we live. Our current town is no exception. Our local grandma had a birthday and requested a German Chocolate Cake. Last years request was the same, and was my first ever German Chocolate Layer cake. I think it was tasty - but not really photo worthy! I learned a few things and the cake turned out beautiful this year.
My mom would have been proud, it was on a beautiful cake pedestal (she taught me that presentation is everything), it was on time, and I even took a photo before we walked out the door.
Saturday, August 11, 2012
Orange Glazed Blueberry Scones
I do love blueberries, they don't grow in Utah but thanks to Costco I have blueberries. These scones were delicious, I had plenty of company to share them with. This recipe was give a full 5 stars by my eager testers.
Orange Glazed Blueberry Scones
2 cups four
1/3 cup sugar
1 tablespoon baking powder
1 teaspoon salt
2 cups blueberries
1/4 cup frozen butter--grated
3/4 cup buttermilk or cream--I used half buttermilk half cream
1 egg
In a large bowl stir together the flour, sugar, baking powder and salt. Add frozen butter that has just been grated. Mix with your fingers, you should have a nice mix of different size pieces. Or use a pastry blender.
In a small bowl mix together buttermilk and egg. Add liquid to dry mixture and gently mix. Add in blueberries and gently stir. The more you stir the tougher the scones. Gentle is the word.
Using a large Pampered Chef Scoop put scoops of batter on a parchment lined pan. Bake at 400 for about 18 minutes.
Orange Glaze
2 tablespoons butter
2 cups powdered sugar
zest and juice of 2 oranges
In a small saucepan mix all ingredients and simmer until sauce starts to thicken. Once thick stir well and brush or spoon on scones. This glaze should slightly harden.
I wanted to make an orange butter cream frosting--which would be yummy. The glaze added a fun dimension.
This recipe is adapted from Tyler Florence
Labels:
blueberries,
breads,
breakfasts,
brunch,
buttermilk,
freezer meal,
frosting,
muffins,
oranges
Thursday, August 9, 2012
Oven Roasted Corn
This post is really not rocket science--but it is something you will want to try. How do you cook fresh corn on the cob? Probably the same way your Mother did. My mom filled a huge pan with water, brought it to a boil (which seems to take forever) dropped the husked corn in and boiled it for 5 minutes. The corn was done--you had a huge pot of boiling water heating up your August kitchen. But the corn was good so that's the way you cook corn.
Enter my daughter Jill. While visiting we wanted corn, it's perfect right now. Jill suggested we roast the corn in the oven. I was leery at first, I mean who puts corn complete with husks on in the oven?? We did and it was delicious. I will never boil another ear of corn. Thanks Jill for breaking the cycle!
Oven Roasted Corn--Tyler Florence
Preheat oven to 350. Pace corn (husks on) directly on oven rack. Roast for 30 minutes. Pull husks down, silk is easily removed. Use husks for a handle while eating. Enjoy one of the best foods of summer!
Monday, August 6, 2012
Berry Galette TWD/BWJ
This was one fun recipe! Pies scare me but a Galette I can handle. I like the words rustic, free form and open faced. I think a galette is a pie on vacation!
The galette dough came together in just minutes in my food processor. This dough calls for cornmeal--an interesting crust ingredient. I like most anything with cornmeal so I was anxious to try it. With a well floured board I had no problem rolling out the chilled dough. I then piled blueberries in the center of the dough. I sprinkled the berries with sugar, drizzled them with a little maple syrup and dotted with butter. The crust was then folded, pleated around the fruit. I brushed the crust with water and sprinkled some sparkling sugar on top. I thought it was a masterpiece (remember I'm not a pie maker).
As it baked juice did leak out but it did not affect the taste. We all enjoyed this dessert, The cornmeal crust was delicious and the blueberries screamed 'summer'! I can't wait to make this galette with peaches and apples. The recipe stated that the galette would make 4 to 6 servings. The galette is quite small, I wouldn't try to serve more than 4 guests. A scoop of vanilla bean ice cream tops this dessert.
Subscribe to:
Posts (Atom)