Pages

Wednesday, March 27, 2013

Chicken Popper Quesadilla


In between all the Easter candy you might want something real to eat this weekend! This is easy to fix, perfect for lunch and tastes delicious. I'm always happy when I have pinned something and it turns out better than expected. The idea came from Plain Chicken Blog. I made it to suit our tastes. I'm excited to make it for company this weekend. I'm sure the kids will be happy with plain cheese quesadillas but for the adults I want to step it up a notch!

Chicken Popper Quesadillas
1/2 cup whipped cream cheese
2-3 tablespoons of salsa (I used Pace's Original Medium)
chopped cooked chicken, grilled is good or a rotisserie chicken is an excellent choice
chopped pickled jalapenos
flour tortillas
Mix whipped cream cheese and salsa together to taste--you don't want it too runny. Spray tortilla with cooking spray and cook one side till just brown and crisp. Remove to cutting board and spread cream cheese and salsa mixture on half of brown tortilla. Sprinkle chicken on top then top with chopped jalapenos. Use a little or a lot. Fold tortilla and return to hot pan and brown both sides of tortilla.Cut in thirds and serve with salsa. This was easy and delicious. Try it.
[Printable Recipe]


One Year Ago------Creamy Garlic Pasta
Two Years Ago----Southwestern Cobb Salad with Chili Lime Dressing
Three Years Ago---Make Ahead Pasta Sauce
Four Years Ago----Mini Almond Cheescake

Sunday, March 24, 2013

Crock Pot Roast Chicken--SRC


Secret Recipe Club is a great way to meet new bloggers and have fun along the way. Each month you are assigned a blog and then you have several weeks to 'stalk' this blog. That is the fun part--I looked at page after page on Megan's blog Cooking Whim's. Each page was full of great stuff! I really liked Megan's blog because it has something for everyone. Healthy dishes, product reviews, yummy desserts, restaurant finds and so much more.
Megan has some fun 'getting to know me' blog posts. Megan has red hair, is recently married to her high school sweetheart and loves her nightly workout (so she can eat what she wants). Megan has a love affair with all things pumpkin--I pinned many recipes for fall baking. 
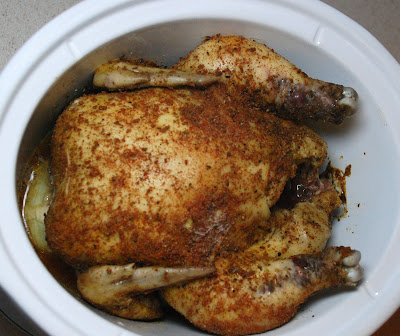
So many recipes on Megan's Blog looked delicious but is is still very cold in Utah. I was intrigued with her Crock Pot Roast Chicken, it was as delicious as she described. I will never buy another Costco Rotisserie chicken again. It was so simple.


 Megan's Crock Pot Roast Chicken
 Mix together:
2 teaspoons salt
1 teaspoon paprika
2 teaspoons garlic powder
1/4 teaspoon black pepper
1/2 teaspoon poultry seasoning
Rinse roasting chicken and dry. Rub seasoning mixture all over bird. 
Quarter an onion and place in the bottom of the crock pot. Make 4 or 5 balls of aluminum foil about the size of golf balls. Place in the bottom of the crock pot--this will keep the chicken from sitting in its juices. Place the chicken on top of foil ball and onion. Cover and cook on high for 1 hour, lower heat and cook till meat thermometer reaches 165 degrees. Depending on the size of the bird this will take 4-5 hours. Watch closely, over cooking will dry out the bird and nobody wants a dry bird!
We enjoyed this chicken with roasted veggies. There was plenty of chicken left over for Chicken Pot Pies.
I have some fun spice blends in my spice cupboard. I can't wait to try this bird many ways. It's another great way to use your slow cooker. Thank you Megan!
[Printable Recipe]


Wednesday, March 20, 2013

Cinnamon Biscones


I'm having a great time with The Back in the Day Bakery cookbook. They have a fun recipe for Biscones. A Biscone is a cross between a biscuit and a scone. It is a quick recipe that requires neither kneading or rolling. It was tender and delicious. Cinnamon chips were a fun addition and a light drizzle was the finishing touch.
This fun recipe will be at the front of my recipe box!

Cinnamon Biscones
1 1/2 cups Cake Flour
1 1/2 cups AP Flour
1/4 cup sugar
2 Tablespoons baking powder
3/4 teaspoon Sea Salt
1/4 teaspoon ground cardamom
2 sticks cold butter, cut in 1/2 inch cubes
1/2 cups cinnamon chips
1 1/2 cups milk
1 egg, beaten
sanding sugar
Powdered Sugar Glaze
1 cup powdered sugar
1/2 teaspoon vanilla
milk or cream to the desired consistency 

In a large bowl combine the flours, sugar, baking powder, salt and cardamom.
Cut in butter with a pastry blender, you will various sized pieces of butter from sandy patches to pea sized chunks. Add the cinnamon chips. Stir in milk and gently fold the ingredients until you have a soft dough with no flour at the bottom of the bowl. You will still see chunks of butter--don't worry, this is a good thing.
Using the large Pampered Chef Cookie Scoop, scoop the dough on a parchment lined sheet pan. Brush the dough mound with beaten egg and sprinkle with sanding sugar. Bake at 375 for 20 minutes--don't over bake.
When cool drizzle with powdered sugar glaze. These are best eaten the day they are made. This batch makes about 23 Biscones. Unless you are feeding a big crowd I would half the recipe. I'm sure the dough would freeze, just portion the mounds on parchment, flash freeze and store in a freezer bag for 1 month. To bake, put frozen dough on a parchment lined sheet and bake as directed, you may have to add another minute to the baking time.
[Printable Recipe]

One Year Ago------Coconut Pecan Chocolate Chunk Bars
Two Years Ago-----Corn Chowder
Three Years Ago----Coconut Tea Cake--TWD
Four Years Ago-----Mini Almond Cheescake

Tuesday, March 19, 2013

Creamed Tuna on Cheese Biscuits


It's often dangerous to ask hubby what his favorite meal is. He loves my cooking but would often choose something quite simple like Beefy Macaroni  Skillet or his all time favorite, Creamed Tuna on Cheese Biscuits. We had this as a child--it was inexpensive to make and Mom always had the ingredients in the pantry. She made homemade bread so that is what we had the Creamed Tuna on. My Dad had a name for it that always caused laughs (I have 5 brothers). In an effort to keep this blog G rated I won't say his name but I'm sure you can guess it!
Actually served on these yummy Cheese Biscuits it was pretty tasty. It is a 30 minute meal and most certainly comfort food.
Greg's favorite meal
3 tablespoons flour
3 tablespoons of butter
2 cups of milk
1 can albacore tuna drained and flaked
Make a rue with the flour and butter, boil for one minute. Add milk and stir rapidly with a whisk to remove all lumps. You should have a smooth sauce. Add tuna, salt and pepper to taste. Serve over Green Onion and Cheese Biscuits. Your hubby will love you forever. This meal has childhood memories.
[Printable Recipe]

 One Year Ago.......Pistachio Cherry Ice Box Cookie SRC
Two Years Ago......Beefy Macaroni Skillet--Greg's Favorite Meal
Three Years Ago....Make Ahead Pasta Sauce
Four Years Ago......Crustless Ham and Artichoke Quiche
 This is a yummy list of dishes--try one today.

Friday, March 15, 2013

Happy Birthday Jill


Today is Jill's birthday--these are some things I don't want to forget about Jill.

She was my only child that came early. She was a full week early, what a fun surprise. My labor and delivery with Jill was easy. I think I checked in the hospital around midnight and she was born 2 hours later. That's quick for me. Her Dad was awestruck with her beauty, he remembers holding her shortly after birth and marveling at the miracle of creation.

We were older when we had Jill (like 30). Candise was 8, Amber was 7, Scott was 5 and Paul was 3. Although we were busy we enjoyed having just one baby. Jill's sibling adored her.

Jill had plenty of beautiful dark hair. At two weeks I had a hair appointment. I took Jill with me and she got her first trim. Jill was a beautiful little gal with a calm disposition.

She was a delight to have around. I never bothered to enroll her in pre-school because I wanted to be with her.She was just a fun happy child.

Her favorite past time was coloring and cutting. She also enjoyed riding her trike (that just had two wheels) around in circles in the carport.

Jill enjoyed outings with her Dad, not just the usual Daddy Daughter stuff. She enjoyed hiking with him and Max to White Rock Meadow to roast marshmallows. She loved family dinners at the canyon where we made foil dinners and fished. With Greg there were always fish to be caught. Hiking Mt. Timpanogos was always a grand adventure.

Jill had many close friends. They were always up to something fun, a scavenger hunt, a play or turning my house into a giant spider web with black yarn.

Jill loved her Laramie cousins KaLee and Erica. She spent some time in Laramie and every time KaLee and Erica came to Utah the first stop was our house.

Jill has the most positive disposition--she knows thing will work out and she works hard to see that they do.


Jill married her college sweetheart Scotty. They have been blessed with 3 beautiful children--that we just adore. Jack, Bianca and Delaney. Scott and Jill both graduated from UVU when Bianca was just a month old and Jack was one and a half. It was a wild ride but they made it work. Don't tell Jill she can't do something because she will prove you wrong every time!


You go girl! We love you much and are so happy to be your parents.
Love, mom and dad

Wednesday, March 13, 2013

Chicken Pot Pie for PI Day


Pi Day Pie Party

I hate to admit it but I am not a pie maker. I like cookies and brownies. Years ago hubby asked me when I was going to be old enough to make pies. My response was always, 'In ten years'. When you say that in your mid 20's you think you will have plenty of time to learn to make pies. I have given him the answer over and over.
Well the time has come, I think I am finally old enough to make pies! I remember all the fun pies that were posted last year on PI Day. This year I would have a pie for PI Day. Thanks to Barbara Bakes and Dorie I finally felt that I could tackle a pie. I started out easy with a Chicken Pot Pie. I opted for just a top crust--baby steps. I made a quick crust in my food processor--nothing difficult about that. The filling was a delicious sauce full of veggies and meat. I used 6 inch pie pans (they are just so cute) because there are just two of us. One pie was plenty for dinner and enough for a hubby's lunch tomorrow. I also have enough filling for a mini pie to take to Mom tomorrow. Life is good now that I am a Pie Maker!

Chicken Pot Pies
 Pastry
2 1/2 cups flour
1 teaspoon salt
4 tablespoons butter, chilled
2/3 cup shortening, chilled
Ice water--about 5 tablespoons
Pulse flour and salt in food processor. Drop in diced cold butter and cold shortening and pulse just till they are cut in. Dorie says you should have pieces the size of fat green peas and others the size of barley. Add the ice water and pulse off and on until you have a mixture that sticks together when pinched. Dump the mixture on a Roll'pat and gather together and form into 4 discs. Wrap in plastic wrap and refrigerate at least an hour.
This whole process really only takes a few minutes.

Filling
1/3 cup butter
1/3 cup diced onion
1/3 cup diced celery
1/3 cup flour
1/3 cup milk
1 3/4 cup chicken broth
1/4 teaspoon salt
1/4 teaspoon pepper
1 1/2 cups diced cooked chicken (Rotisserie works great)
1 1/4 cups diced cooked potato
1/2 cup diced cooked carrots (you could use frozen)
1/2 cup frozen peas
Melt butter in pan, saute celery and onions about 5 minutes or until tender, add flour and seasonings. Whisk and bring to a bubble, cook for a minute. Add milk and chicken broth, heat and stir until mixture becomes quite thick, cook for a minute. Remove from heat and add chicken and veggies. Put in individual ovenproof dishes. Don't overfill. Roll out pastry on a lightly floured Roll'Pat, make sure you roll it out an inch bigger than your dish. Put pastry on top of pie, crimp if using a pie plate. Cut a slit in the top to let steam escape. If using a dish with straight sides just let pastry hang down and lightly press to sides of dish (check out Barbara's post to see this method). Bake at 425 for 30-35 minutes till light brown.

Will I make this again??? YES! It is comfort food at it's finest. It's not a 30 minute meal but with some planning it can be a weeknight meal. Dorie says that well wrapped the pastry can be kept in the fridge for 5 days or the freezer for 2 months. How nice would it be to always have some pastry in your freezer. The filling came together quickly. I diced my potato and cooked it in salted water for about 8 minutes, I took the potato out and then added the diced carrots to the boiling water for a few minutes till they were crisp tender. The chicken was left over from a roasted chicken earlier in the week. You could make the filling earlier in the day but I would heat it up before it goes in the tin.
I used the leftover filling and filled a small dish, I love the rustic look and how the pastry is draped over the dish. More crust per bite--that's a good thing! 
[Printable Recipe]


Tuesday, March 12, 2013

Hello Dolly Cookies


When any of the Harris girls find a new recipe they are quick to share the good news. Jill made these cookies, sent me an e-mail and said they were her new favorite cookie. Amber made them and raved about them. She even told Candise that it just might be worth being sick one day to experience these cookies (Candise has just discovered that gluten containing foods make her quite ill).
With so many good reviews I had to make them. Yes, they are delicious. They are a cookie form of the ever favorite 7 Layer Bar, Magic Cookie Bar or as we called them Hello Dollies. They are full of yummy ingredients and they contain no eggs so the dough is fair game--and it is yummy. Enjoy! These cookies are inspired by a recipe on one of my favorite blogs, Mel's Kitchen Cafe

Hello Dolly Cookies
1 ½ cup graham cracker crumbs
½ cup flour
2 teaspoons baking powder
1 14 ounce can of sweetened condensed milk
½ cup butter, softened
1 1/3 cups coconut
1 ½ cups chocolate chips
1 cup walnuts or pecans coarsely chopped
Mix together graham cracker crumbs, flour and baking powder. In bowl of mixer beat butter and sweetened condensed milk until smooth. Add cracker mixture, mix well. Stir in nuts, coconut and chocolate chips. Bake at 350 for 13 minutes. Cookies will set up as they cool.

Sunday, March 10, 2013

Lemon Pie Bars


There is nothing I like better than guests on Sunday that need dessert! My sweet Mother in Law brought a yummy Chicken Pasta Salad and fresh fruit. I took care of the dessert. These Lemon Pie Bars were a hit with everyone. Fresh and lemony--a glimpse of spring.
The only thing better than a yummy dessert is a yummy dessert that is very easy. I put these Lemon Pie Bars together while the oven heated. Now that is a quick dessert! This recipe comes from a new cookbook I purchased called, "The Back in the Day Bakery Cookbook" by Cheryl Day and Griffith Day. This bakery is located in Savannah Georgia. Every recipe looks delicious. I can't wait to try more!
I cut the recipe in half--I really didn't need a 9x13 inch pan tempting me. A 8x8 inch pan made 9 perfect servings. Just right for dinner today.


Lemon Pie Bars
Crust
1 1/2 cups graham cracker crumbs
6 tablespoons butter, melted
1 tablespoon sugar
Mix ingredients together and press in the bottom of an 8x8 inch pan that has been sprayed and lined with parchment paper. Bake at 350 for 8 minutes, cool completely (I just put it in the freezer for 5 minutes) turn oven down to 325 degrees.
Filling
1/2 cup heavy cream
2 teaspoons grated lemon peel
1/2 cup fresh lemon juice
1 can sweetened condensed milk (14 ounces)
3 egg yolks
Whisk together all filling ingredients and pour in cooled crust. Put pan in a larger pan and fill large pan with hot water half way up the side of the small pan. Bake for 20 minutes until center is just set. Remove the pan from the water bath and cool at room temperature for 1 hour. Refrigerate until cold. Top with whipped cream and lemon zest.

1 year ago--------Caramel Crumb Bars
2 years ago-------Chicken Corn Chowder
3 years ago-------Thumb Prints for Us Big Girls
4 years ago-------Thai Chicken Salad

Friday, March 8, 2013

Photo Shoot Gone Bad


One of my goals this year is to waste less food. I like to cook, but cooking for two presents a few problems. Leftovers. Always leftovers. I had some sticky rice in the fridge from a meal earlier in the week. I was so proud of myself--I was actually going to turn this rice into Ham Fried Rice. I had everything in the fridge for this tasty dish.
Since it was to be a  main dish it was full of veggies, meat and eggs. I checked the 450 posts on my blog and realized I had not posted Ham Fried Rice. It really isn't a recipe it's a clean out the fridge dish. It's different every time I make it. It's a method that I wanted to share.
I assembled the ingredients and took a great photo. Then I noticed the bottle of Soy Sauce was almost empty so I wanted to fill it (I purchase Soy Sauce by the gallon at Costco). I take my photos by a big west facing window. Below the window is a shelf with dishes on it. If the dished are stacked just right I can balance a cutting board on top and take my photo. Yes it is precarious but it works--most of the time. As I removed the bottle of soy sauce the center of gravity changed and it all came tumbling down. It crashed to the floor. Eggs smashed, a treasured dish broke, mushrooms rolled and very sticky rice was everywhere.
I made Crustless Ham and Artichoke Quiche instead and I left the mess for my sweet hubby to take care of. So Ham Fried Rice is on hold.


Tuesday, March 5, 2013

That Really Good Pasta

I often associate food with what is happening in my life. This pasta came along when we were going thru some tough times. I had a house full and made this yummy pasta. It was comfort food--just what we needed at that moment. I never could remember the name of it, we just referred to it as "That Really Good Pasta". Life was chaotic at that time and somehow I lost the recipe. We searched and finally found the source. It came from a great blog, "Get Off Your Butt and Bake". If I only had one day left on earth...I'd want this Pasta, she claims. And I think I would agree!
Life has slowed down a bit and I made this pasta again--it was still as delicious as I remembered it. My daughter was doing the food for a luncheon for 30 women. She made this pasta, it was a hit. This recipe may seem labor intensive but all the components can be made ahead and then assembled at meal time. That is a plus when feeding a crowd.
Why is this so good? Is it the bacon or the fried ham, it may be the asparagus or the creamy sauce. All I know is that it adds up to one amazing dish. Try it soon.


That Really Good Pasta
1 1/2 cups diced cooked chicken (rotisserie works great)
1 cup diced fried ham
1 cup crisp bacon for the sauce
1 cup crisp crumbled bacon for the top
1 diced Roma tomato (squeeze the juice out)
6 stalks of cooked asparagus, or cooked broccoli can be used
1 cup grated Parmesan Cheese for sauce plus additional for the top
Pasta--whatever you like, mini bow tie works great

Sauce:
1 cup cup milk
1 cup chicken broth
1 cup whipping cream
1 cup grated cheddar cheese
1 cup grated Parmesan cheese
2 tablespoons butter
2 tablespoons flour
1/4 teaspoon garlic powder
1/4 teaspoon onion powder
a few sprinkles of red pepper flakes
1 teaspoon sugar
1/2 teaspoon cracked black pepper
2 tablespoons fresh lemon juice

Directions:
Fry bacon till crispy, remove to a paper towel lined plate to drain. Fry diced ham in a small amount of the bacon grease. Sprinkle 1 tablespoon of brown sugar on the ham, cook until brown sugar is caramelized and the ham is golden brown. Set aside
Melt the butter, add the flour and stir for a minute. Add seasoning and whisk together until bubbly. Whisk in the milk, cream and chicken broth. Stir constantly until you have a smooth thick sauce. Lower heat and add the grated cheddar and Parmesan cheese. Stir till melted and smooth. Add 1 cup of the crisp bacon, the fried ham and the chicken and lemon juice.  Cover pan and keep on very low heat. Cook pasta till al dente. I would cook about a pound of pasta--but you might not use all of it. Drain pasta.
Plate pasta, pour sauce on and top with crisp bacon, asparagus, diced tomato and Parmesan cheese. If sauce seems too thick add a bit more broth or milk. Or mix sauce with pasta--make sure you don't have too much pasta. You can always add more pasta but you can't take it out! Top with bacon, cheese, diced tomato, asparagus and Parmesan cheese.
Leftovers make a great lunch. Warm it up in a saucepan--don't let it get too hot.
Recipe from, Get Off Your Butt and Bake , thank you very much!

Monday, March 4, 2013

Chocolate Banana Bread


Whenever I need a no fail recipe I go to joyofbaking.com. This site is a great resource for all things baking, She has recipes, videos of many of the recipes, an awesome substitution chart. Top 100 recipes of the year. It is worth spending some time there.
I had pinned a Chocolate Banana Bread. The chocolate is not overwhelming--it let's the banana peek thru. It is an easy recipe, certainly a beginner could tackle this recipe.


Chocolate Banana Bread
1/2 cup toasted walnuts or pecans, coarsely chopped--take the time to toast them they are so much crisper
1 3/4 cups all purpose flour
1/4 cup unsweetened cocoa (Dutch Processed or Regular) I used Dutch Processed
1 cup white sugar
1 teaspoon baking powder
1/4 teaspoon baking soda
1/4 teaspoon salt
1/2 cup white, dark or milk chocolate chips
2 eggs lightly beaten
1/2 cup butter, melted and cooled
3 ripe bananas, about 1 pound, mashed well (about 1 1/2 cups)
1 teaspoon vanilla

Pre-heat oven to 350 degrees..The recipe said to use a 9x5x3 inch loaf pan. Mine happened to be a bit smaller so I also made a dozen mini muffins. I use Bakers Joy and my muffins and bread popped right out.

Place the nuts on a baking sheet and bake for about 8-10 minutes until lightly toasted. Cool and chop.

In a large bowl whisk together the flour, cocoa, sugar baking soda, baking powder and salt.

In a medium sized bowl combine the mashed bananas, eggs, melted butter and vanilla. With rubber scrapper lightly fold the wet ingredients into the dry ingredients until just combined. Batter will be thick and chunky. Fold in the nuts and chocolate chips. Using a mini Pampered Chef Scoop place 12 level scoops of batter in prepared pan. Scrape remainder of batter in loaf pan. Mini Muffins bake for just  13 minutes--trust me on that one. The bread will take 45-55 minutes. Start checking at 45. Bread is done when pick comes out clean. Place on a wire rack and cool then remove from pan. Bread is yummy warm or it also keeps well in a freezer bag. Enjoy